Until a few months ago, my photos had been backed up and synced into Google Photos. It worked perfectly well - I could easily navigate through my pictures, share them with friends, and they were backed up on something other than my physical devices.
There was only one small problem with this: all my photos were with Google…
From Google to Proton
Over the past few months, I’ve slowly been trying to reduce my reliance on American Big Tech companies. The reasons behind that, and the alternatives I’ve switched to, will probably make for an interesting future blog post. But the important part for this story is that it also meant I didn’t want to store my personal photos with Google (even though they pinkie-promise their AI won’t scan them!)
As I had chosen to move to Proton as my email service, I decided to try out Proton Drive’s Photos feature. It did its job for the basics - I could store and scroll through images and videos, and even automatically back up photos from my phone. I could make albums and share media with people, and look through my old photos from anywhere.
So what’s the problem with it? Well, for me at least, there were quite a few. The options for searching through photos are quite limited. At best, I could filter by date, filename or type, or scroll through the timeline. It also took quite a while to load photos when scrolling through the timeline. It worked well as a private photo backup, and solved the privacy concerns I had with Google, but didn’t really feel like a photo library to actually interact with.
How Immich Won Me Over
I looked around at some other options, and quickly started considering self-hosting something. I had been looking at setting up a homeserver for a while, and even bought two large HDDs some time ago to get myself started, so this seemed like the perfect way to actually put them to use.
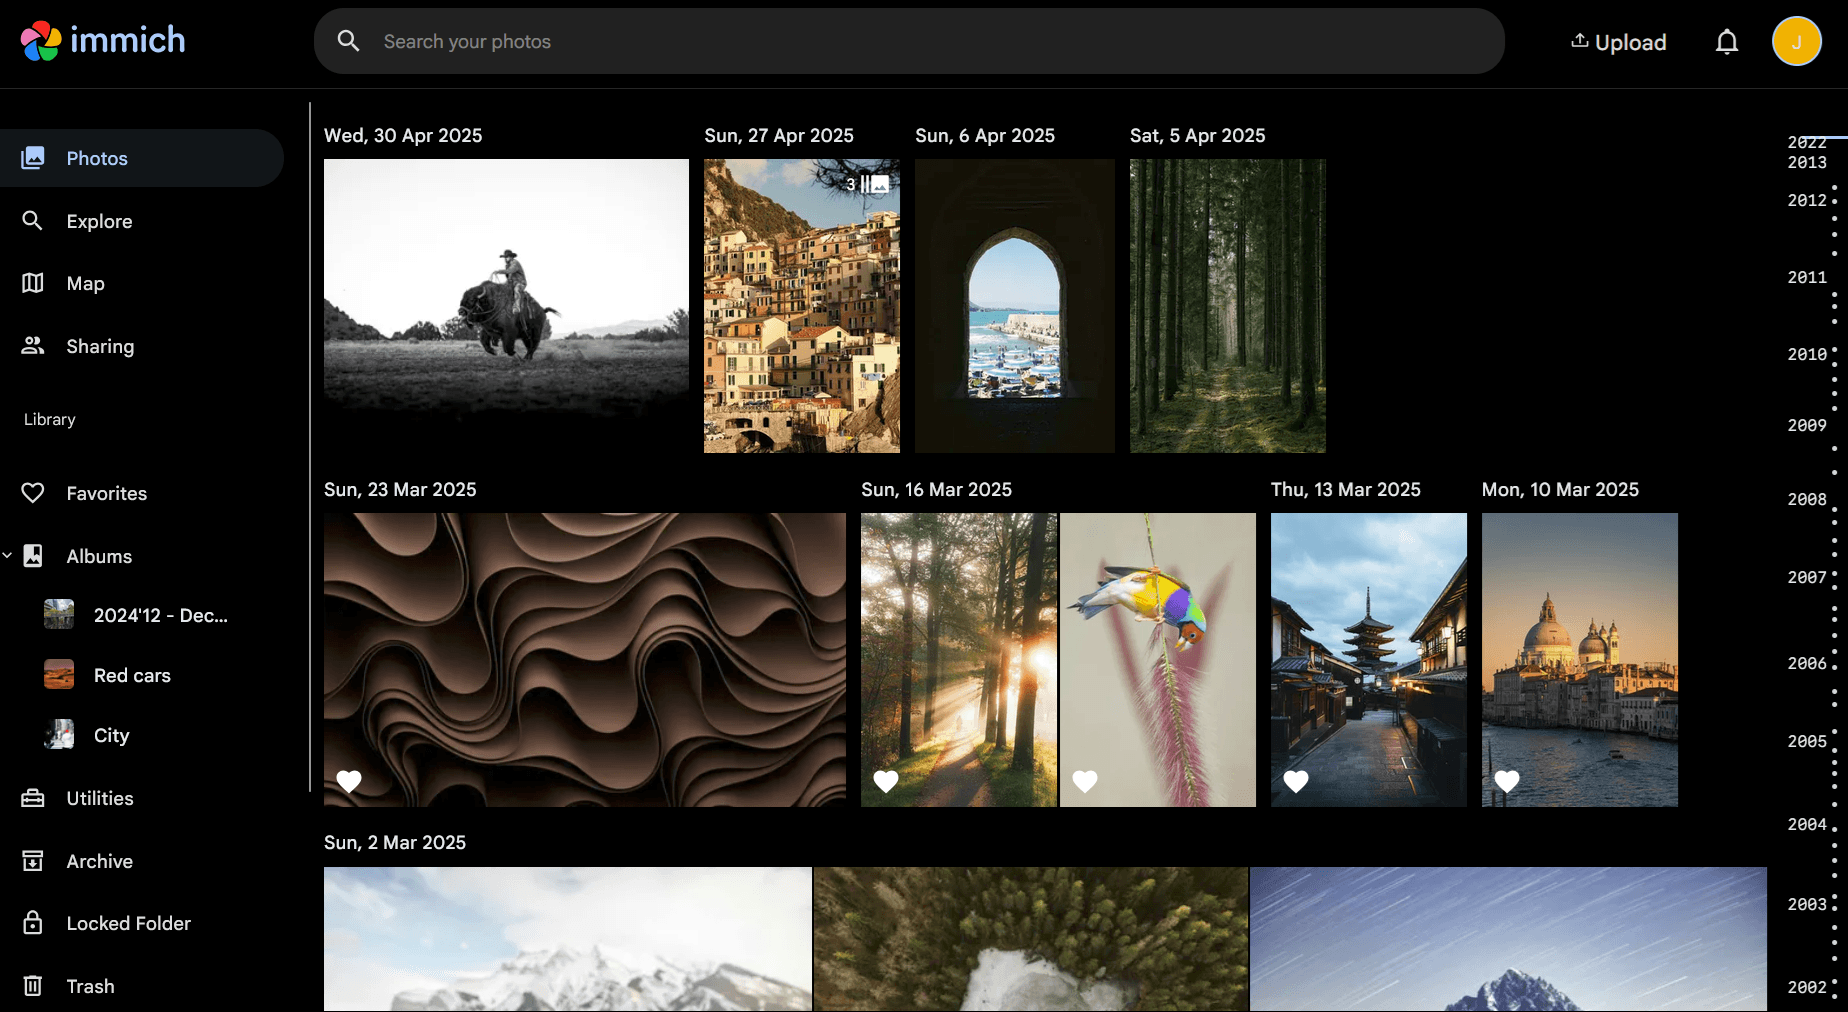
I looked at a few options for a self-hosted photo library and soon came across Immich. Immich immediately seemed to fit my needs perfectly - it is self-hosted, has an interface that’s easy to use on both mobile and desktop (and looks nearly identical to Google Photos), has great options for searching and organising pictures, and even supports sharing photos or albums with friends.
So I took out my Raspberry Pi that I hadn’t used in a while, did a fresh install on it, and mounted my hard drives. I followed Immich’s own tutorial for setting it up through Docker Compose, configured Immich’s upload/library location on the external drive, created a user, and soon after I could upload and view my photos over the local network. I uploaded a batch of images to test with, downloaded the mobile app, and everything was working as expected.
Another huge bonus was Immich’s machine-learning features: facial recognition, OCR, and Smart Search, which help a lot with finding specific images. These work through locally running models, meaning none of my pictures are sent to the cloud for processing. On the Pi, it worked surprisingly well, even on the relatively limited hardware. At that point, I was convinced I’d found what I was looking for - Immich felt like the right Google Photos alternative.
So… Why Not Stop There?
Even though the setup was working as I’d hoped, I wasn’t fully satisfied with it yet. The two biggest issues I had with this setup were data resilience and accessibility. The images were still only stored on my own hardware. The second issue was that Immich was still only available from my local network, meaning that I couldn’t easily use it remotely, and it also wasn’t possible to share my photos with others.
Backing Up Immich
Immich itself didn’t really end up being a photo backup for me - after setting it up, I quickly realised that it was how I would be interacting with my media from here on out. And of course, only storing the data there would be quite risky. From a corrupted disk to ransomware to me knocking a glass of water over my home server, there were plenty of ways to lose data, and I didn’t want to risk it.
After looking around a bit, I settled on Hetzner and their Storage Box option to create cloud backups. Using Restic, I could create versioned, encrypted backups, so that I can restore old versions of files if needed and so that even the cloud provider doesn’t have access to the unencrypted media. I decided to back up the full media drive, as well as the most important configuration on the Pi so I could easily restore the entire setup if needed. I configured the backup to run every night while I was asleep.
I also have two HDDs connected to my Pi, and up to this point, my data didn’t even get close to filling up one of them - so I decided to use the second disk for redundancy for now. I figured that the most likely source of data loss would be a drive becoming corrupted or failing, so just having the data on a second local drive would make it significantly easier to restore a backup, as restoring the full backup over the network would take a lot longer than over a direct connection. So I set up a second Restic repository, also backing up the image storage and Pi configuration every night. This wasn’t a replacement for the off-site backup, but just a much faster way to recover from a potential drive failure.
This gave me a much safer feeling about my data - if one disk failed, I could restore it from the second disk, and even if the entire home server died, I could restore everything from the Hetzner Storage Box. It would take longer, but at least the data would still be there.
Making Immich’s Machine Learning Faster
While Immich’s Machine Learning features worked perfectly fine on my Raspberry Pi, processing an initial library of thousands of images took hours to process. Which isn’t necessarily an issue, but it still seemed like something I could improve.
Luckily, Immich supports using multiple machine-learning endpoints. So I decided to set up the same immich-machine-learning Docker container on my personal laptop, and give the Pi access to it over the local network. I set the container to automatically start when I start my laptop, so Immich starts using it whenever it’s available. When it’s not available, it’ll simply fall back to the internal machine learning on the Pi itself.
The Real Rabbit Hole: Opening Up to the Internet
The Immich setup worked great from my home network. But since it was still running on the local network, it would be inaccessible as soon as I left home. I thought about fixing this through VPN access, but since I also wanted to be able to share links to images, videos or albums, I decided that it would be more worthwhile to just expose Immich to the internet.
However, since the server contains thousands of personal photos, it was important to set this up in a safe way. I could have just port-forwarded Immich’s port on the Pi, configured my subdomain to point to my public IP, and called it a day. But even with my limited networking knowledge, I knew that this wasn’t the safest option.
I started looking into reverse proxies, and that seemed like a better approach. A reverse proxy is essentially a service between the incoming request and the other services on the Pi. This meant I only needed to expose Caddy to the internet, while Immich could remain accessible only internally on the Pi.
I chose to use Caddy for this, as it seemed lightweight and easy to use. It also has the benefit that it handles HTTPS certificates automatically, so I don’t need to worry about that anymore. I created a DNS record from a new subdomain to my public IP, set up my router to port-forward it to Caddy, which could then forward requests to Immich.
After just a few seconds, I could reach the new subdomain, Caddy had generated the necessary certificates, and I could use Immich from outside my network through the mobile app and browser. I also tried to share a link to an album with some friends, and they could indeed see the shared content without getting access to the rest of my library.
And Then Things Got Complicated
There was just a small issue with my current setup… My internet service provider doesn’t provide a static IP, meaning that my IP address could change if, for example, the router shuts off for some time. Luckily, my domain provider supports Dynamic DNS, meaning that it can automatically update the DNS record to point to my IP even if it changes. I configured this by setting up a small script, running every few minutes in the background. The script makes a call to the dynamic DNS service, which detects the public IP the request came from and updates the DNS record if it has changed.
With that issue resolved, I still didn’t really feel like my services were protected enough. Yes, it worked, but that’s not really good enough for a service exposing thousands of public images to the internet… I looked into some options to further protect my internet-facing services to prevent suspicious behaviour, and that’s where I came across CrowdSec.
CrowdSec can be used to detect suspicious behaviour and identify malicious IP addresses by inspecting logs as well as crowdsourced block lists. I set it up in Docker, as I had been doing with all other services, gave it access to Caddy’s logs, and integrated the caddy-crowdsec-browser plugin so that CrowdSec’s decisions could be enforced by the reverse proxy. After a few hours, I could verify that it actually blocked some HTTP probing requests!
Of course, this doesn’t magically secure the entire server, but it does make things like repeated login attempts harder. It was just an extra layer of security that made me feel a bit better about exposing my service. However, this did go from wanting to run a simple photo library to having a reverse proxy, HTTPS certificates, Dynamic DNS and intrusion detection… I started to see where this was going.
Two-Factor Authentication for Immich
I also wanted to enable two-factor authentication for my Immich server, just to make sign-in more secure than a password alone. I assumed this would just be a toggle in the admin settings to enable it, as many other open-source services support this. But of course it wouldn’t be that simple…
Unfortunately, Immich currently does not natively support 2FA. The development team’s reasoning is that “Implementing a good authentication system is hard” and that it’s better to delegate it to people who know what they’re doing by supporting OAuth - which, I guess is a valid point. Immich doesn’t dedicate its resources to building an authentication system and instead focuses on their core product, the image library. And since they do support OAuth, that means external providers can be used to sign in instead of the native username/password system.
But with how deep I had gotten with self-hosting this setup, I didn’t want to just connect an external OAuth provider to sign in with - so I started looking at other options, and quickly came across Authentik. Authentik is an open-source identity provider that supports OAuth, meaning that I could host my own OAuth provider to authenticate through.
So I followed the documentation for setting up Authentik, exposed it through Caddy, set up the same Dynamic DNS logic as for Immich, and soon I had another working service running. It was easy enough to configure Immich to use Authentik for signing in and disable the native username/password authentication following the Official Documentation. I configured a minimum password strength and enforced 2FA, both for my own account and any potential other users I might add in the future.
Monitoring the Pi
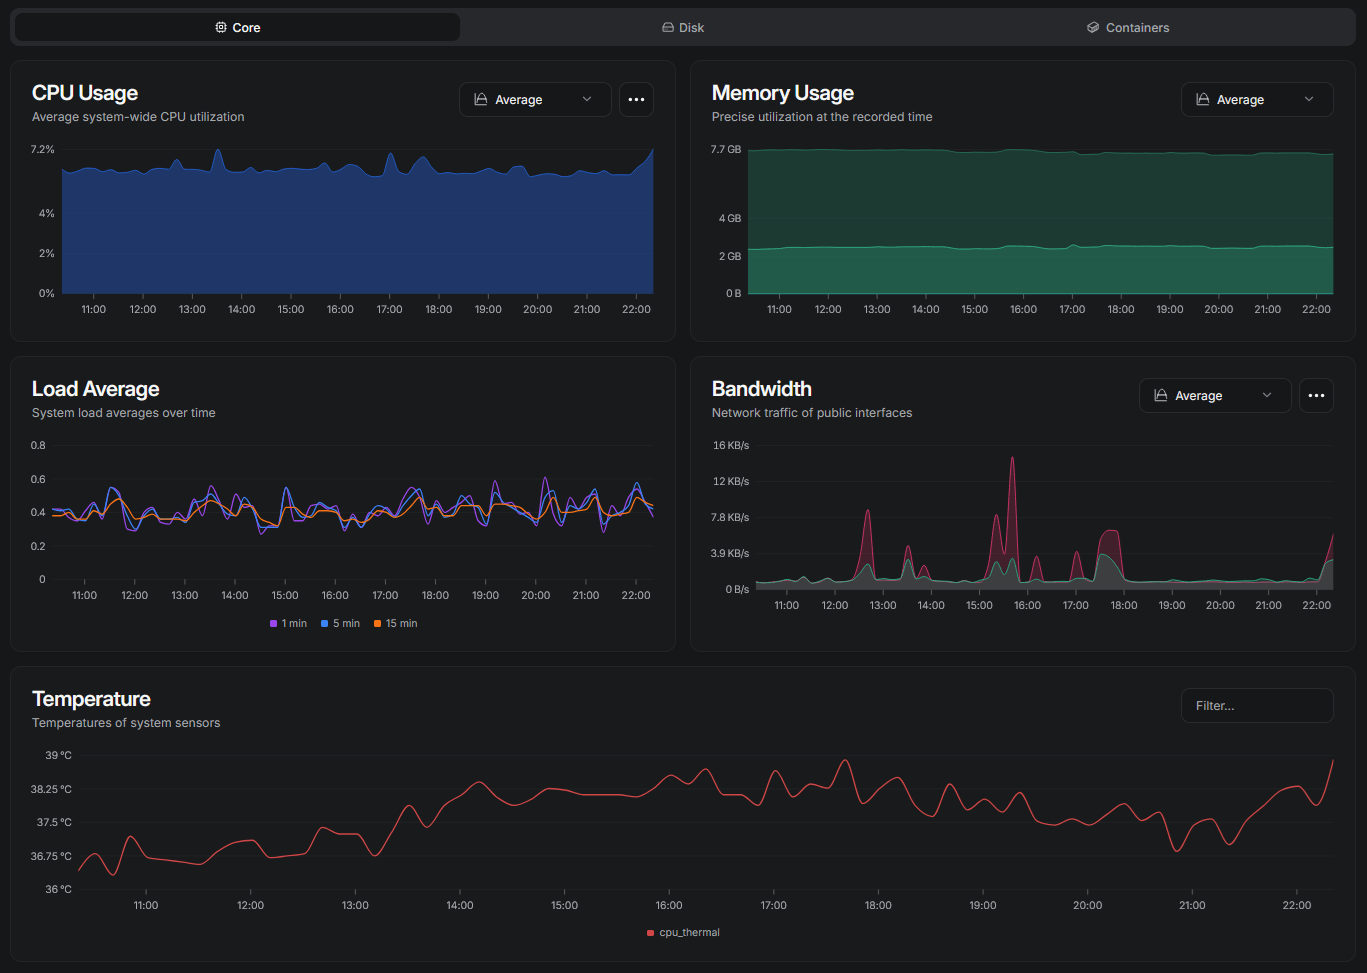
I now had quite a few services running on my Pi, with no good way to see the load on it other than through console commands, which wasn’t the most convenient. How much CPU and RAM was Immich’s machine learning using? How hot is the Pi while running? Did any of my services stop working? Of course, setting up just another service for this felt like the perfect solution!
I knew monitoring tools like Grafana and Prometheus are commonly used in larger environments for monitoring, but they felt a bit overkill for my needs, and I didn’t want to add anything too heavy to my server just to see some statistics. So I looked for some alternatives and came across Beszel.
So back I went, configuring another service just like the others, following Beszel’s setup documentation, exposing it through Caddy, setting up my DNS to point another subdomain to it, and deciding to also use the Authentik provider I had already set up for authentication. The result was exactly what I needed - a nice dashboard showing how my Pi was performing.
I set it up to monitor the Pi itself as well as the disks, so it could see the SMART status of the disks and notify me early of potential disk issues. I then configured it to send email notifications when a service goes down, a disk has issues or almost fills up, or the Pi runs under extremely high load, so I would know if I needed to take action in the future.
But What If Everything Goes Down?
While Beszel could notify me of a lot of potential issues, there are a few cases where it can’t help - if Beszel itself goes down, or worse, the entire home server, obviously it has no way to notify me. I decided the best way to solve this was with an external uptime monitor.
I already had a small VPS running with Hetzner, on which most services weren’t really being used anymore. So I decided to clean up the VPS, removing all unused services and updating its OS and packages. Then I set up Uptime Kuma as a Docker container, exposed it behind its own Caddy proxy, set up DNS for another subdomain pointing to the VPS… You know the drill by now.
After setting it up, I did the initial configuration, set up an account, and added a monitor for each of my services. I decided to use Kuma’s own authentication instead of my Authentik provider, as that wouldn’t work anymore if my Pi were down.
I configured Kuma to ping each service every minute, and if it doesn’t get a response, it knows the service is down. If a service is down for two pings in a row, I configured it to send me an email notification. This way, potential network issues or tiny restarts don’t immediately flag the service as broken, but I still get notified quickly enough if something does break.
From One Service to a Whole Stack
At this point, I decided I was finally happy with my setup, at least for now. So, let’s take a step back and look at what it actually looks like:
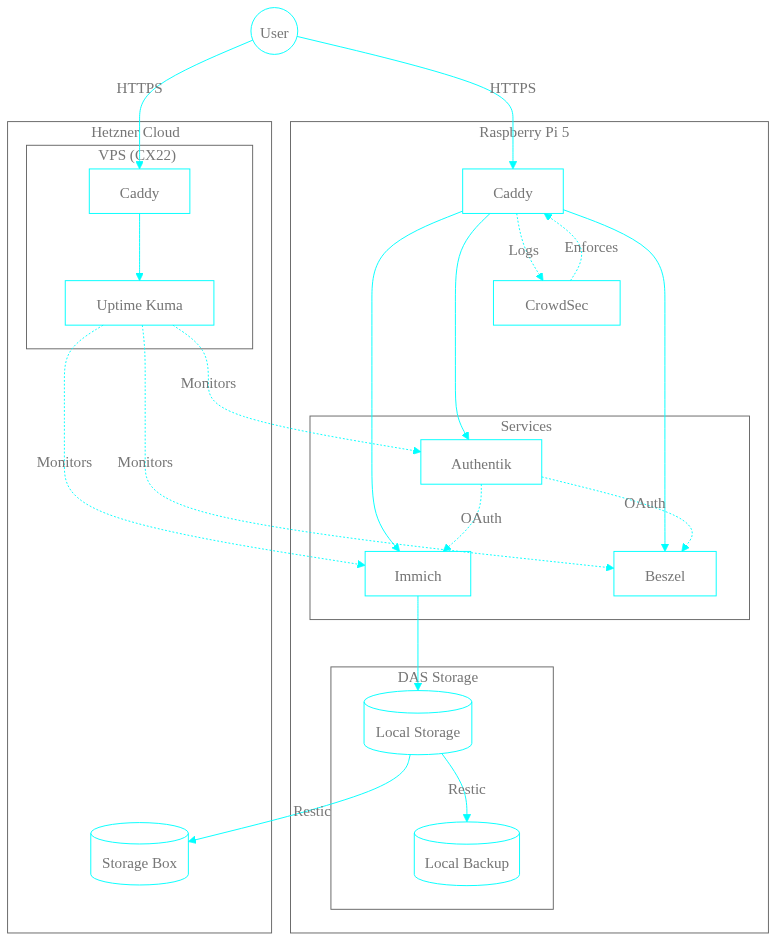
It ended up being quite a lot of architecture for what was supposed to be a simple service. But now it’s more resilient and (hopefully) secure, and I learned a lot while setting it up.
Conclusion
I started out just experimenting with self-hosting an application to conveniently store and access my personal photos. But somehow it turned into a whole personal infrastructure stack made up of backups, authentication, monitoring, security and an external VPS. While not all of these are necessary, it was a fun journey to set them up one by one, solving each new issue that came to mind.
Because why would you keep things simple if you can overcomplicate them?
And lastly, to round things up, here is the list of the ten things I ended up running as a result of self-hosting Immich (as the title promises!)
- Immich itself, of course
- Remote machine learning on my laptop
- Restic backups to an extra drive and the cloud
- Dynamic DNS
- Caddy as a reverse proxy
- CrowdSec for network protection
- Authentik for OIDC
- Beszel for local monitoring
- Kuma for uptime monitoring
If you’ve been counting, you might notice that that’s only nine things… So you might ask where the tenth one is. Well, of course it’s this blog that you are reading right now ;)